
Even though golfers regularly invest thousands in drivers, irons, and putters, they usually neglect the most crucial component of their equipment—grips.
Your grip connects your hands to the golf club, and old grips can secretly destroy your:
- Swing consistency
- Shot accuracy
- Control over distance
- Self-confidence
However, the positive side of all this is that regripping golf clubs is not as difficult as many golfers perceive it to be. Having your clubs regripped not only restores their tacky feeling and grip, but it also helps save money and allows you to customize their sizes and textures. It is quite simple to accomplish when you have everything you need and know how to approach the procedure in the correct order.
This comprehensive guide contains all the information you should know about “How to Regrip Golf Clubs“.
Why Regripping Golf Clubs Matters
After extended use, grips become harder, lose grip and might cause the club to slip out of your hand, thus deteriorating the accuracy of your shot. New grips provide more feedback, reduced grip pressure, and help maintain constant swing mechanics.
How You Know Your Golf Grips Are Worn Out
Most golfers put off replacing grips for much longer than necessary. These are the key indicators that your grips need replacement:
1. Uncomfortably Slippery
- Any kind of twisting action of the club during your swing indicates that the grip has gone bad.
2. Any Smoothing
- As the material of the grip gets worn out, its surface gets smoother.
3. Hardening or Cracking
- Too much exposure to heat and sunshine might lead to the grip becoming brittle.
4. Need for More Squeeze
- When you start needing extra pressure on the grips, it means they have gone bad.
5. Less Comfort
- A worn-out grip will be uncomfortable in your hands.
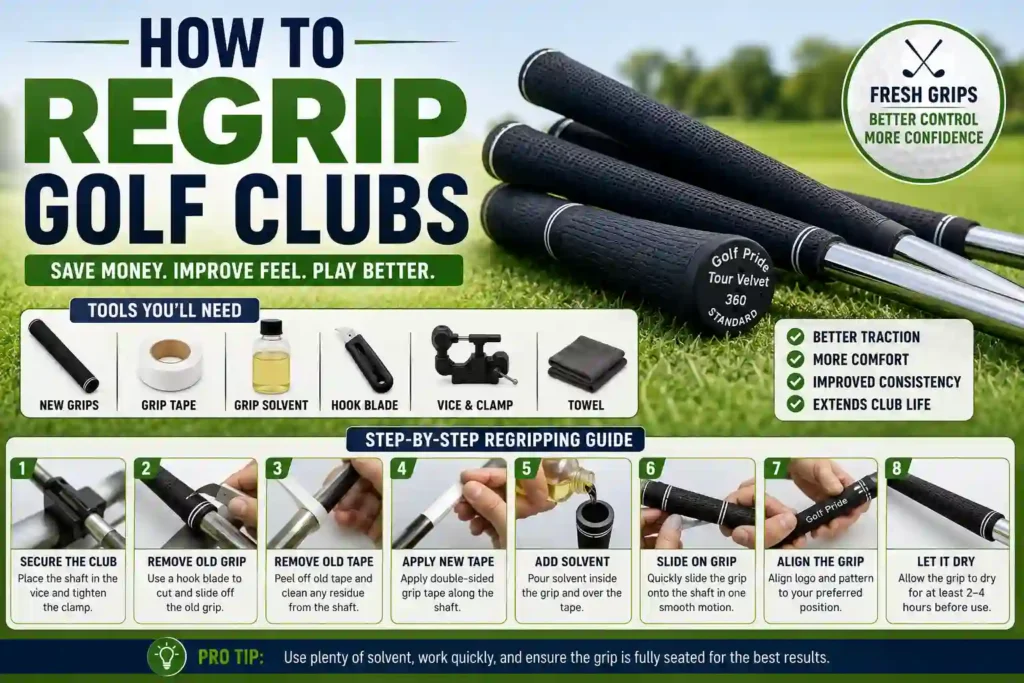
Tools and Material Needed
What you will require to get started is a bench vise with a rubber pad to protect the club shaft, hook blade or a utility knife, grip tape with double-sided adhesive (typically used by professionals), a clean rag, grip solvent (mineral spirits or specific grip solvent) and grips of your choice. Additional materials that can be useful include a grip solvent catch tray and few extra grips to experiment on.
Essential Regripping Tools
| Tool | Purpose |
|---|---|
| New golf grips | Replacement grips |
| Double-sided grip tape | Secures the grip |
| Grip solvent | Helps slide grips on |
| Hook blade or utility knife | Removes old grips |
| Vice with rubber clamp | Holds club securely |
| Towel or rag | Cleanup |
| Tray or container | Collect excess solvent |
Step-by-Step: How to Regrip Golf Clubs
Now let’s go through the full process.
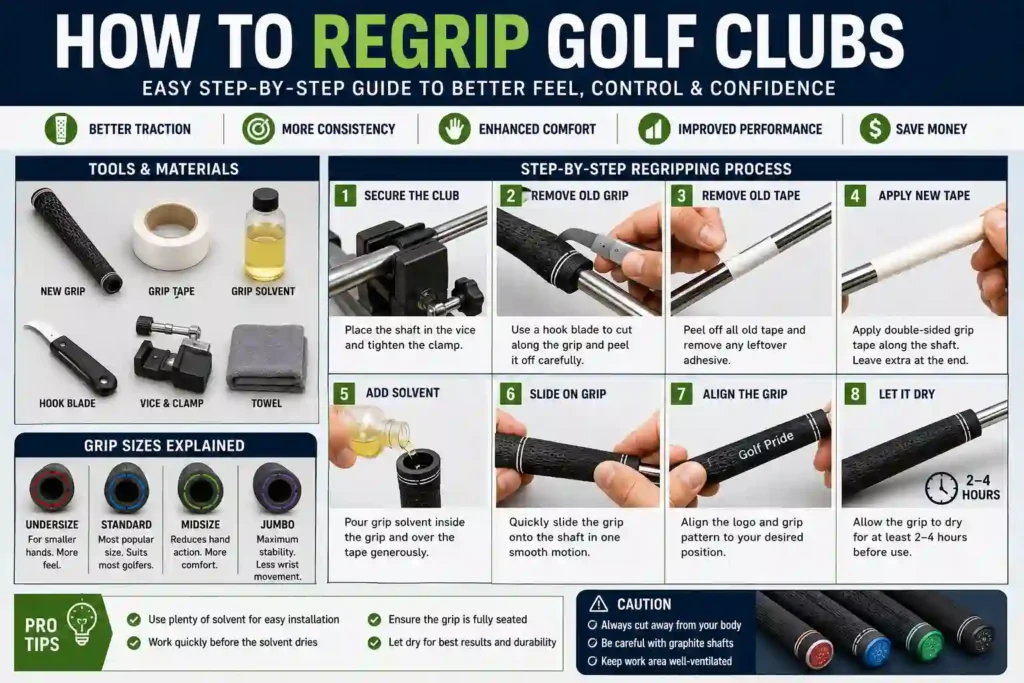
Step 1 – Secure the Club
To make sure you have an easy time removing and putting on a grip, put the shaft in the bench vise just below the grip level with the rubber pad to keep from damaging your golf club.
Step 2 – Remove the Old Grip
Carefully cut your grip along its whole length with a hook blade. Be extremely cautious as you cut, remembering never to do it towards yourself. You might find it necessary to apply gentle heating to loosen up old adhesive to make it easier to take off the grip.
Step 3 – Clean the Shaft
Remove remaining tape using your blade/stripper, then clean the shaft thoroughly with solvent-soaked rag to remove grease and dust left behind.
Step 4 – Apply Double-Sided Grip Tape
Prepare tape with length matching that of the grip (10-11 inches). Peel back one backing of the tape, and start wrapping the tape spirally on the shaft starting just below the future location of the grip. Leave about half an inch of the tape protruding past the grip end to serve as the end cap sealant.
Step 5 – Prepare the Solvent
Pour plenty of grip solvent inside the new grip through its vent hole. To stop the fluid from leaking out, you should cover the hole temporarily with a finger or a golf tee. Shake your grip to make sure the solvent coats its entire inside. Then pour solvent over the exposed tape to get it wet.
Step 6 – Put On the New Grip
While the solvent is still wet both on the grip and tape, quickly install your grip by holding the butt against the grip end, and pushing it down the shaft. Make sure to push the new grip completely on the shaft until the end of the grip meets the end of the club shaft; the protruding part of the tape should go under the grip end cap, creating a seal.
Step 7 – Align the Grip
It should be done immediately after the grip installation, when the solvent is still wet and the grip can be moved around easily. Align your grip in terms of logos, alignment dots, or patterns in line with the face of the club head.
Step 8 – Let the Grip Set
Just place the newly regripped club upright, and leave it like this for at least several hours until all the solvent evaporates from the tape and the grip. The majority of guides recommend waiting at least 12-24 hours until complete drying.
Regripping Tips to Remember
Do it in a well-ventilated space since the solvent vapor emitted is very toxic. Use hook blade instead of straight blade for graphite shafts to minimize the risk of damaging them. When regripping for the first time, buy extra grips that you will use for practicing to avoid having ruined your favorite set. Have a clean rag always at hand to remove excess solvent from the grip and shaft edge; this will reduce the risk of slipping the grip later during playing.
What Should You Avoid Doing?
Remember, you need to handle your hook blade carefully to avoid nicks on graphite shafts; they should never be cut towards yourself. Leaving the old tape residue on the shaft leads to an unevenly thick grip. Not applying enough solvent to your grip and tape will make your new grip hard to install and may cause the appearance of air bubbles between grip layers. Failing to align the grip means an ill-fitting grip with wrong hand positioning.
Maintaining Grip After Regripping
Regularly inspect your grips for any signs of wear and clean them with mild soap and water to extend their lifespan. It is also important to keep the temperature constant during storage to minimize grip aging rate.
How Frequently Should Golf Clubs Be Regripped?
One popular guideline:
- Re-grip yearly or after every 40-60 rounds
But this can vary based on:
- Weather conditions
- Practice routines
- Grip type
- Storage environment
In hot, humid environments, golfers typically require more frequent regrips.
Cost of Regripping Golf Clubs
1. DIY Regripping Cost
| Item | Approx Cost |
|---|---|
| Golf grips | $5–$15 each |
| Tape & solvent | $10–$25 |
| Vice clamp | Optional |
Professional Regripping Cost
Golf shops typically charge:
- $3–$8 labor per club
- Plus grip cost
Full sets often range:
- $80–$200 total
DIY regripping can save substantial money over time.
Advantages of Regripping Your Own Clubs
Cost Savings
- Particularly applicable for sets.
- Customization Options
Options to customize include:
- Texture
- Size
- Color
- Feel
Improved Understanding of Equipment
More knowledge on:
- Club fitting
- Preferences
- Tuning equipment
Quicker Turnaround
- No delay at club repair shops.
Best Grips for Different Conditions
Hot & Humid Weather
Best:
- Corded grips
- Hybrid grips
Rainy Weather
Consider:
- High-traction grips
- Moisture-resistant material
Cold Weather
Use:
- Soft grips
Should Golfers Start Regripping Clubs Themselves?
Definitely!
Regripping is:
- Easy to do
- Inexpensive
- A great skill for beginners
It takes only one instructional video to learn how to regrip clubs.
Conclusion: Is Regripping Golf Clubs Worth It?
Absolutely.
Regripping can help you:
- Feel better
- Have more control
- Gain confidence
- Be less tense
- Play better
And being able to do this by yourself will save you money, time, and effort. No matter your level of experience, proper regripping of your clubs will make a world of difference when playing on the golf course.
As far as golf is concerned, even the slightest connection may turn out to be very significant.
FAQ: How to Regrip Golf Clubs
Q1: Why would I want to regrip my clubs rather than simply buy new clubs?
Regripping helps to restore tackiness, responsiveness, and control that are worn off through usage, as well as improve your feedback, decrease grip pressure, maintain consistency in the mechanics of the swing, and save on spending.
Q2: What equipment and supplies will I need in order to regrip on my own?
In order to regrip you will need a bench vise with a rubber clamp, hook blade or a utility knife, grip tape, grip solvent (either mineral spirits or specialized grip solvent), a clean cloth, and the grips themselves.
Q3: How can I take off the old grip without damaging the shaft?
You will need to cut the old grip in the middle with the help of a hook blade (always cut against yourself), and gently pull it off; if it does not come off easily, heat up the adhesive with the help of either a hair dryer or a heat gun.
Q4: How do I orient my new grip after fitting it onto the shaft?
When you put your new grip on, while solvent is still fresh, rotate it to the proper position relative to the face of your club (the solvent will stay liquid for approximately 30-60 seconds).
Q5: How long will I have to wait until I am able to start using the club?
Give the solvent enough time to evaporate – the time ranges between several hours to 12-24 hours, depending on what you are reading.
Also, Read: Callaway Supersoft Golf Balls | TP5 vs TP5x | Best Golf Balls for Beginners | Pro V1 vs Pro V1x